
DIY Kegerator Cabinet
Tired of lugging bottles and cans to every backyard bash? Dream of pouring perfectly chilled craft brews on tap right from your kitchen? Join the kegerator crowd and unlock the freedom of draught beer at home. Transforming an old fridge into a slick kegerator is now a breeze with DIY builds. Whether you’re craving a freestanding marvel to showcase your tap handles or a built-in stunner concealed behind cabinet doors, it’s simple to create a jaw-dropping kegerator with basic skills. Learn how to design and build a customized kegerator cabinet to become the toast of the town. Your ultimate home draft system awaits!
Choose a refrigerator
The first step in building a kegerator cabinet is to choose a refrigerator. You can use a full-size refrigerator, compact refrigerator, or chest freezer. The Danby Compact Mini All Refrigerator is a popular choice for a compact refrigerator.

When selecting a refrigerator or freezer for your kegerator, consider the interior dimensions and layout. Look for a model with enough height to accommodate corny kegs or sixth barrels and adequate width for the number of taps you plan to have. Ensure any shelves or crispers inside are removable or can be worked around.
Opt for a refrigerator with a top-mounted compressor to maximize usable space inside. Also, choose an energy-efficient model to save on electricity costs for long-term use. Compact refrigerators like the Danby are ideal for small spaces, and kegerators designed to fit under a counter.
Look for used refrigerators or freezers on Craigslist or garage sales to find an affordable unit for your DIY kegerator build. Just be sure to test the cooling performance before purchasing. With the right refrigerator or freezer selected, you’ll have a solid foundation for your kegerator cabinet project.
Choose a kegerator conversion kit
Once you have chosen a refrigerator, you must choose a kegerator conversion kit. These kits can be purchased online or at homebrew stores. They typically include a CO2 tank, regulator, beer lines, and faucets.
A complete kegerator kit provides all the components to tap and dispense beer from kegs. The CO2 cylinder holds carbon dioxide that powers the system. The regulator controls the pressure going to the kegs for proper carbonation and pouring.
You’ll also need beer lines and faucets – choose chrome or stainless steel for a sleek look. Get as many faucets as the number of kegs you plan to serve. Picnic taps are common for home builds. Get a beer line sized appropriately for your system – usually 3/16 inch ID for short runs under 10 feet.
Kits often include connections and clamps for securing lines. Look for kits with NPT threaded connections for easy assembly. For a clean look, get a tower kit that neatly organizes lines and taps together.
Shop for conversion kits that fit your planned number of kegs and taps. More taps allow serving multiple beers. Kits with everything included making kegerator assembly straightforward. With the right components, you’ll be pouring pints in no time from your DIY cabinet build.

Gather your tools
You will need a few tools to build your kegerator cabinet, including a drill, saw, screwdriver, and wrench.
Essential tools for constructing a DIY kegerator cabinet are:
- Power drill and drill bits – for drilling holes and driving screws
- Circular saw or jigsaw – for cutting cabinet panels and trimming openings
- Screwdrivers – both Phillips and flathead bits for assembling cabinet boxes and kegerator kit
- Adjustable wrench – for tightening fittings and connections on gas components
- Measuring tape – to get accurate dimensions for cutting
- Wood glue – for joining cabinetry pieces
- Sandpaper – helps smooth over joints and rough edges
- Safety gear like gloves and eye protection are a must!
Make sure to have these standard tools on hand before starting your build. Specialty tools like a router for edges or a nail gun can speed up construction but aren’t required. The right tools and quality materials will help the DIY kegerator cabinet come together smoothly.
Modify the refrigerator
To convert the refrigerator into a kegerator, you must drill holes in the door or side of the refrigerator for the beer lines and faucets. You may also need to remove shelves or drawers to make room for the kegs.
Start by measuring and marking holes for the tap tower or individual taps. Use a hole saw bit to drill clean openings, just large enough for the shanks to fit through snugly. Place the holes at a height that allows proper clearance for the keg couplers.
Remove any internal shelves or drawers that get in the way using a screwdriver. You want an open interior to fit ball lock or pin lock kegs. If needed, use a jigsaw to cut a larger opening in the freezer compartment wall to maximize interior space.

Clean up plastic shavings and use grommets or soft sealant around tap openings to avoid scratching lines. Test fit the faucets and be sure exterior collars or washers seal up holes neatly.
Prepping the refrigerator interior is key to accommodating kegs. With smoothly drilled openings and clearance to fit kegs, you’ll have an ideal draft system foundation before building up the exterior cabinet.
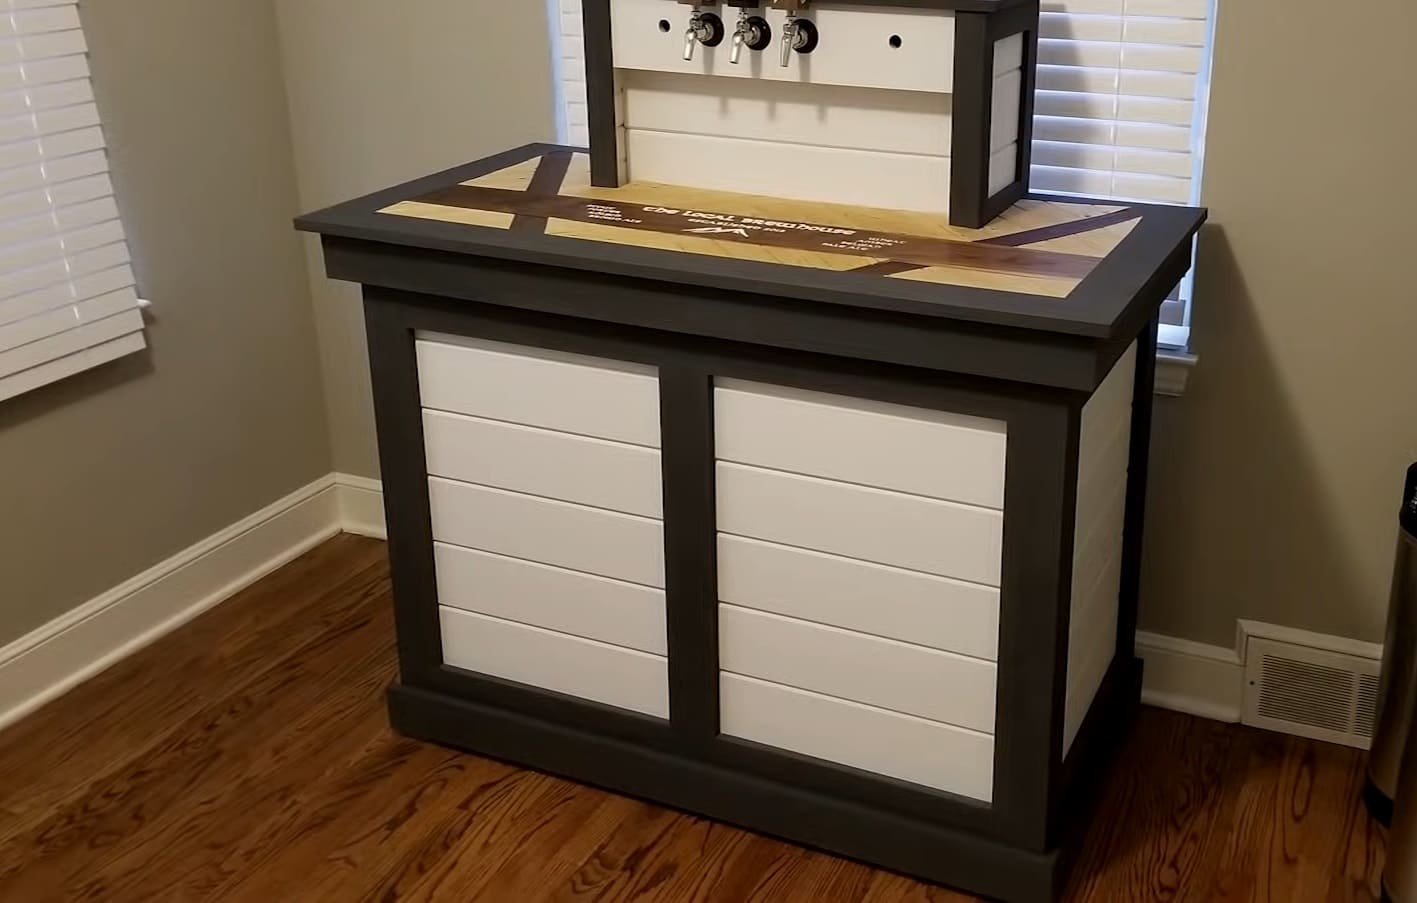
Build the cabinet
Once the refrigerator is modified, you can build the cabinet around it. You can use wood or other materials to build the cabinet, and you can customize it to fit your style and needs.
For a simple cabinet, cut panels to size from 3/4 inch plywood using a circular saw. Cut panels slightly larger than the refrigerator dimensions to allow room. Attach the panels into a box using wood screws and wood glue. Apply edge banding to finish raw plywood edges.
Add cabinet doors to conceal the refrigerator – attach with hinges and handle pulls for a sleek look. Or leave it open to show off the taps and tank. Use decorative molding and trim for additional flair.
Paint or stain the cabinet your desired color. Add a countertop cut from butcher block, laminate, or stone to match your kitchen. Consider casters for mobility or build as a permanent under-counter installation.
Take time designing elements like tap tower placement, drip tray integration, and gas cylinder storage. Customize to fit your refrigerator model, available space, and personal style. With quality materials and precise sizing, you can create a kegerator cabinet that looks professionally built.
Install the kegerator components
Once the cabinet is built, you can install the kegerator components, including the CO2 tank, regulator, beer lines, and faucets.
Start by securing the CO2 cylinder to the interior wall or a shelf using nylon straps or chains. This keeps it upright and in place. Install the regulator onto the tank by tightening the nut.
Run the gas and beer lines neatly through the cabinet and into the refrigerator, securing them with clamps if needed. Attach the lines to the regulator and keg couplers using the provided connectors.
Push the grommeted shanks of the faucets through the exterior holes and tighten the locking nuts. Place a drip tray lined with a drain grate beneath the faucets.
Use hose clamps and tightened hose barbs for leak-proof connections. Keep lines organized using cable ties or hooks. Label your lines with tap numbers.
Once assembled, test the system by pressurizing the tank and listening for leaks. Pour water through the faucets to check for proper flow. Now load in your legs, chill, and enjoy frosty homebrew on tap from your DIY marvel!

Test and adjust
Once the kegerator is assembled, you must test it and adjust the temperature and pressure as needed. You can also add custom graphics or finishes to the cabinet to make it your own.
After installation, let the refrigerator cool down fully before adjusting the temperature. Monitor it with a thermometer and adjust the control dial to get the interior down to 36-38°F for properly chilled beer.
Set the regulator to your desired PSI – start with 10-12 PSI for standard beers. Turn up the pressure for highly carbonated styles or longer line runs. Drink a few test pours to dial in the perfect foam and carbonation level.
Add fun labels, vinyl wraps, or chalkboard paint to customize your kegerator exterior. Apply a clear coat to wooden cabinets for waterproofing and enhanced beauty. Install LED lighting to illuminate your taps and bottles.
With good temperature, the right pressure, and personal flair, your homemade kegerator cabinet will be a conversation starter at any gathering. Adjusting a few final touches makes it both functional and fabulous.
FAQ
What are the benefits of a DIY kegerator cabinet?
Building your kegerator cabinet allows full customization to fit your space, tap needs, and style preferences. It can also be much more affordable than buying a premade model. DIY builds let you add creative personal touches.
What maintenance is required?
Periodically clean the faucet lines with line cleaner solution to prevent growth and replace gas cylinders as needed. Monitor and maintain proper kegerator temperature and system pressure.
What type of wood should I use?
Plywood, poplar, birch, oak, and pine are good options. Use 3/4″ thick wood for structural integrity. Choose a hardy material like oak if not painting/staining. Avoid porous woods like MDF that swell with moisture.
What joinery techniques should I use?
Screws with wood glue create strong corner joints for basic builds. Advanced options are pocket holes, dados, rabbets, or tongue and groove for hidden joins. Apply edge banding to finish exposed plywood edges.
What safety tips should I follow?
Wear eye and ear protection when using power tools. Follow safe handling procedures for pressurized gas cylinders. Clean spills promptly to avoid slips. Install a drip tray beneath the taps.
Summing Up
Building your kegerator cabinet may seem daunting at first, but it is very achievable with proper planning and step-by-step execution. Start with a refrigerator you can modify into a functioning draft system. Gather essential tools and pick quality materials to construct the exterior cabinetry.
Take measurements carefully and make cutouts for taps and lines using hole saws. Focus on sturdy joinery when assembling the cabinet box. Consider finishes and trim details that match your style.
Proper installation of the kegerator components like gas lines, regulators, and faucets completes the build. Adjust the temperature and pressure for optimized pouring. Add custom graphics or chalkboard paint to make it truly unique.
With attention to detail in the planning and construction, you can create a high-functioning kegerator that looks incredible in your home. Turning an old fridge into a draught beer oasis is incredibly rewarding. Your customized kegerator cabinet will become the highlight of any get-together!